In the modern digital era, it is more crucial than never before to be connected. Whether you are handling personal connections or professional acquaintances, linking your address book to several devices can expedite conversation and even enhance efficacy. Most iPad owners have a problem with synchronizing Gmail contacts on their device. Actually, sync Gmail contacts to iPad is not a difficult process. This article will show you how to sync Gmail contacts to iPad.
Why Sync Gmail Contacts to Your iPad?
To start off the step-by-step guide, lets first discuss why it is important to sync your Gmail contacts with your iPad. If you mainly use Gmail for communicating through emails, then most probably your contact list is stored within the account. Syncing these contacts on an iPad has many advantages
- Access your contacts easily: Whether you’re composing an email, sending a text, or making a FaceTime call, having your contacts readily available on your iPad simplifies the process.
- Ensure consistency across devices: Any changes you make to your contacts on your iPad will automatically reflect in your Gmail account, and vice versa.
- Save time: Syncing eliminates the need to manually enter contacts on each device, saving you valuable time.
Step-by-Step Guide to Sync Gmail Contacts to iPad
Now that you understand the benefits of syncing your Google Contacts, let’s move on to how the contacts on Apple tablet can be synchronized with Google’s email address book. This manual will assist you in reaching, arranging and utilizing your contacts with ease; thus improving efficiency and effectiveness while using your device.
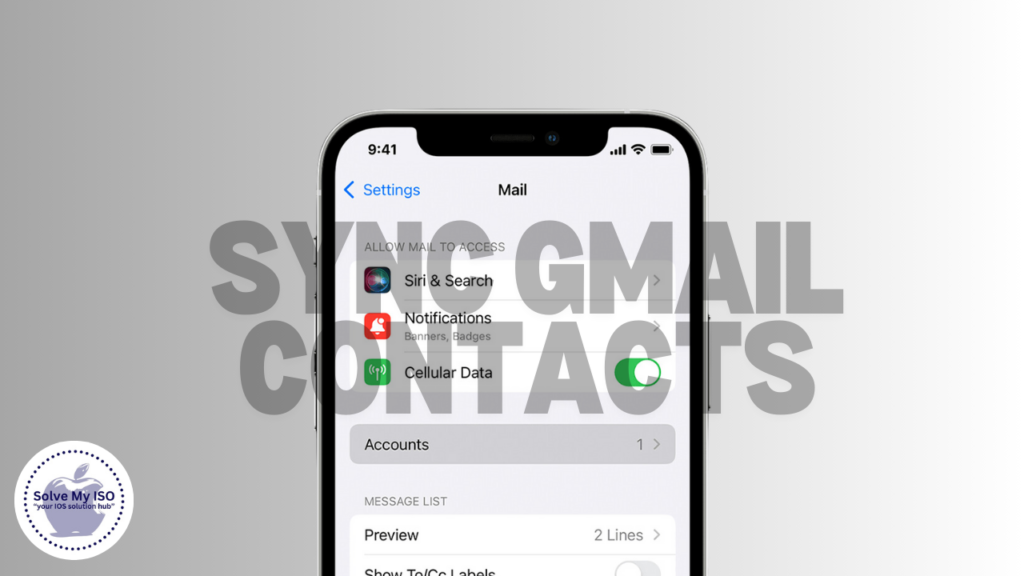
Step 1: Open the Settings App on Your iPad
To find the Settings app on your iPad, begin with the first step. In this list, it looks like a little icon in the shape of gears at the top. By accessing the settings area, one can make modifications to their device and improve its functionality.
Step 2: Navigate to the ‘Mail’ Section
The first thing you should do is open up your Settings app if you want to manage email settings on your iPad. After that, navigate down the left-hand column until you find “Mail”. Here are all of iPad’s basic email settings for better experience on it. Customize these options here to get best use out of email on an iPad.
Step 3: Access ‘Accounts’
Your iPad’s ‘Mail’ settings have an alternative called ‘Accounts,’ which you can locate. By tapping on ‘Accounts’, all of your device-associated email accounts can be smoothly handled. This is a simple way to manage and organize emails.
Step 4: Add a New Account
For an easy way to add your Gmail account onto your iPad, simply tap the “Add Account” option. This process allows you to connect a new email account, ensuring you can manage all your emails in one place. Here is how to go about setting up your Gmail so as to keep everything organized!
Step 5: Select ‘Google’ as Your Email Provider
View the list of email providers, starting with Gmail for adding your Gmail account. Select ‘Google’ among the given options for seamless progression. Thus, by this simple step, you will be able to make it easy to access your emails through connecting them with Gmail.
Step 6: Sign In to Your Gmail Account
To sign in, type in first your Gmail address and password here. It is essential that you input accurate credentials otherwise syncing problems may arise later on. These steps will help you get into your G-mail without much trouble once implemented correctly.
Step 7: Enable Contacts Syncing
After logging in, one can find a lot of possibilities to blend the data on your device such as Mail, Contacts, Calendars and Notes. You must activate the toggle button for contacts. By following this easy procedure, you will have your Gmail people in contact with iPad system right away. The next thing is to switch it on by a simple step that just involves pressing ‘save’ after which any user enjoys quick reach to his/her Gmail contacts via iPad. As a result, all these easy procedures enable you to access your Gmail contacts through an iPad easily!
Tips for a Smooth Syncing Experience
To ensure that your Gmail contacts sync seamlessly to your iPad, consider the following tips:
- Check Your Internet Connection: A stable internet connection is crucial for the sync process. Make sure you’re connected to Wi-Fi or have a strong cellular signal.
- Use an App-Specific Password: If you have two-factor authentication enabled on your Gmail account, you may need to generate an app-specific password to sign in on your iPad.
- Ensure iOS Is Updated: Make sure your iPad is running the latest version of iOS to avoid any compatibility issues during the sync.
Conclusion
Syncing your Gmail contacts to your iPad is an easy way to ensure all of your important contacts are easily accessible. Whether you use your iPad for work or personal reasons, having Gmail contacts on your device can help you stay connected with others when you’re away from home. However, this can be done easily through following the step-by-step guide provided in this article.
Why wait yet you can do it now, visit Solve My IOS and have your Gmail contacts synced to your iPad for better communication. By mastering this process, you are not only making your digital life easy but also ensuring that your contacts are accessed seamlessly across platforms.